A garage door remote lets homeowners operate the door from a distance without using the wall control or keypad, making everyday access faster and more convenient. When a garage door remote stops communicating with the opener system or responds inconsistently, accessing the garage can quickly become frustrating.
In this article, we explain what causes remote failures, how replacement works, and how the new device reconnects with the garage door opener system. Understanding these factors helps homeowners recognize when a remote control has reached the point where replacement restores consistent garage door operation.
Why Does a Garage Door Remote Stop Working After Programming?
A garage door remote may stop responding after programming when internal electronics weaken, signal communication becomes unstable, or compatibility issues prevent the opener from recognizing the transmitted command.
Common reasons a remote stops operating normally include:
- The internal circuitry of the remote control no longer transmits a consistent signal.
- Weak power delivery from aging remote batteries reduces transmission strength.
- Memory conflicts inside the garage door opener prevent the remote from registering properly.
- Interference from nearby electronic devices disrupts the wireless signal.
- Button contacts inside the garage door remote wear down and fail to activate the transmitter.
To understand how remote pairing works, why communication can fail after setup, and what system conditions affect successful syncing, read our guide on How to Program a Garage Door Remote Control, which explains how the remote and opener connect during the programming process.

Understanding When a Garage Door Remote Control Replacement Becomes Necessary
A garage door remote control replacement becomes necessary when the device can no longer send a consistent signal, maintain power, or remain compatible with the opener system.
Common signs that replacement may be needed include:
- The remote only works at a very short range or stops responding without warning.
- Buttons stick, stop registering, or fail to send a signal when pressed.
- Corrosion from a leaking battery in a garage door remote affects internal contacts.
- The remote no longer matches the garage door opener after a system upgrade.
- Reprogramming does not restore steady communication with the opener.
Ongoing signal loss, button failure, and compatibility issues often point to a larger garage door repair need rather than a temporary remote problem.
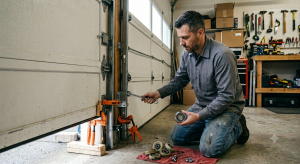
Steps Professionals Follow to Replace a Garage Door Remote Control
Step 1: Confirming Opener Model Compatibility
Matching the replacement remote to the opener system starts with checking the brand, frequency, and receiver type so the new device can communicate with the door opener unit without programming conflicts.
Key compatibility checks include:
- The opener brand and production period must match the replacement remote or the approved universal model.
- Signal frequency needs to align with the receiver already installed in the ceiling unit.
- Rolling-code or fixed-code format must match the system’s communication method.
- The remote button layout should fit the number of garage doors or functions being controlled.
- Garage door opener model details help identify whether older accessories still work with the current setup.
Correct model matching helps prevent syncing problems and confirms that the replacement will work with the current garage door openers, avoiding repeated setup failures.
Step 2: Accessing the Garage Door Opener Learn Button
Locating the garage door opener’s learn button allows the opener to enter pairing mode, enabling the replacement remote to register with the receiver during setup.
Watch for these access points and conditions:
- Side or rear panels often contain the learn button under a light cover or access lens.
- Button color may indicate the receiver generation and supported accessory range.
- An indicator light usually confirms when the opener is ready to accept a new remote.
- Nearby wiring terminals and control features can help identify the correct button area.
- Wall-mounted units may place the learn button behind a front cover instead of near the lamp housing.
LiftMaster explains that the learn button may sit under the light lens or on a side or back panel, and that pressing it opens the programming window used to sync a replacement remote with the garage door opener.
Step 3: Clearing Old Remote Codes From the Opener Memory
Removing stored remote data helps prevent inactive transmitters, lost remotes, or outdated pairings from interfering with the replacement setup.
Common memory-clearing reasons include:
- Lost remotes should be removed to prevent old transmitters from activating the garage door.
- Previous codes may block a smooth setup if the opener’s memory is already full.
- Inactive accessories can create confusion during testing after replacement.
- Receiver memory resets may be needed after repeated failed pairing attempts.
- Erasing stored devices creates a cleaner starting point before the new remote is added.
Memory clearing supports a more controlled replacement process by reducing code conflicts inside the opener.
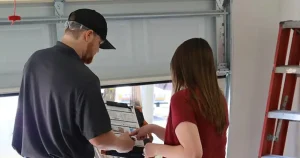
Step 4: Registering the Replacement Remote With the Opener System
Programming the replacement remote links its signal to the opener receiver, so button presses trigger a consistent response from the garage door system.
Look for these programming actions:
- The Learn mode must remain active while the remote sends its first pairing signal.
- Remote button presses may need a specific sequence based on the opener brand and receiver type.
- Indicator light feedback often shows whether the opener accepted the signal.
- Manufacturer’s instructions help confirm how many presses or holds are required.
- Pairing may need to be repeated if the opener exits programming mode too quickly.
According to LiftMaster, remote programming steps can vary by opener and remote type, which is why matching the pairing sequence to the specific system is essential during replacement.
Step 5: Testing Signal Range and Response Consistency
Range and response testing confirm that the replacement remote sends a stable command from normal use points inside and outside the garage.
Check for these performance results:
- Vehicle-entry distance should allow the door to respond without moving unusually close to the house.
- Button response should activate the opener without delay or repeated presses.
- Full open and close cycles should begin smoothly after each command.
- Nearby electronics should not interrupt signal strength during normal use.
- Multiple test locations help confirm that reception stays steady across common approach points.
Consistent range testing helps verify that the replacement remote, receiver, and opener are working together without signal drop-off or activation delays.

How Modern Systems Replace Traditional Garage Door Remotes
Modern access options now give homeowners more ways to control entry, monitor door activity, and reduce reliance on a single handheld device.
| Access Option | How It Works | Main Advantage | Common Limitation |
| Smartphone App Control | Connects the opener to a mobile app through Wi-Fi or a hub so the door can be operated from a phone | Allows remote access, activity alerts, and control from almost anywhere | Depends on internet connection, app setup, and compatible system hardware |
| In-Vehicle Integrated Controls | Links built-in vehicle buttons to the opener receiver instead of using a separate remote | Reduces clutter and keeps access built into the vehicle | May require compatibility setup with the opener brand and vehicle system |
| Wireless Keypad Entry | Uses a wall-mounted keypad outside the garage for code-based entry | Let homeowners enter without carrying a remote or phone | Keypad batteries, weather exposure, and code syncing can affect performance |
| Smart Garage Door Opener System | Combines app control, monitoring, and automation features through connected opener technology | Expands access with scheduling, alerts, and smart home integration | Usually requires newer equipment and a more involved setup |
| Traditional Replacement Remote | Uses a handheld transmitter programmed to the opener receiver | Familiarity with simple button-based access | Can still be lost, damaged, or limited by range and battery issues |
Connected access features are often built into newer garage door installation setups, especially when homeowners want broader control beyond a handheld remote.
What Causes a Garage Door Remote Not to Work After Replacement?
A garage door remote not working after replacement usually points to a setup, signal, or opener-side issue rather than the new remote alone.
Common causes include:
- Programming steps were incomplete, so the opener never stored the new remote correctly.
- Signal frequency does not match the receiver inside the garage door opener.
- Old memory settings or previous codes interfere with the new pairing sequence.
- Interference from nearby devices weakens communication between the remote and opener.
- Receiver problems inside the opener prevent the new remote from triggering door movement.
Problems like failed code storage, signal mismatch, and incomplete pairing often begin during the programming stage, which is why our guide on Why Is My Garage Door Remote Control Not Programming? explains the most common reasons a remote fails to register with the opener system.
How Remote Replacement Connects to the Overall Garage Door System
Remote replacement affects more than the handheld device because the new signal must match how the opener, receiver, and access controls operate within the garage door system.
System connections involved include:
- The opener receiver must recognize the new remote signal before the door responds.
- The stored memory in the unit must accept the replacement remote without causing a code conflict.
- Wall controls, keypad access, and other paired devices may share the same opener settings.
- Signal timing and frequency must align with the system already installed in the garage.
- Safety sensors and control logic still determine whether the door completes each command.
Receiver memory conflicts, stored signal settings, and pairing disruptions often require system reconfiguration, as our article on How Do I Reset a Garage Door Remote Control? explains by outlining how reset procedures restore communication between the remote and the opener system.
Professional Replacement vs Continuing to Reprogram a Remote
Recurring access issues often become easier to evaluate by comparing whether the problem points to a failing remote or a pairing issue that may still respond to reprogramming.
| Factor | Professional Replacement | Continuing to Reprogram a Remote |
| Main Purpose | Replaces a remote that no longer works reliably | Attempts to restore communication with the current remote |
| Best Used When | Buttons fail, signal drops, corrosion appears, or the remote is no longer compatible | Pairing was lost, memory settings changed, or setup was incomplete |
| Hardware Condition | Better for worn or damaged remotes | Better for remotes that still function physically |
| Opener Compatibility | Helps match a new remote to the current opener system | Works only if the existing remote still matches the opener |
| Time Spent Repeating Attempts | Reduces repeated failed programming cycles | May require multiple attempts before the remote connects |
| Risk of Ongoing Problems | Lower if the original issue is inside the remote | Higher if internal remote parts are already failing |
| System Testing | Usually includes compatibility check and response testing | Often focuses only on whether the remote will pair again |
| Long-Term Result | More effective for persistent remote-related issues | More practical for isolated syncing or memory problems |
Persistent signal loss, button failure, and compatibility problems usually support replacement, while a remote that still works physically may still respond to another programming attempt.

Replace Your Garage Door Remote Control Before Access Problems Get Worse
A failing garage door remote control can disrupt daily access and cause ongoing opener communication issues that do not improve with repeated programming attempts. Knowing how replacement connects to the opener receiver, signal system, and access controls helps homeowners understand when a new remote is the better long-term solution.
Royale Garage Door Service helps homeowners in Mission Viejo, CA replace a garage door remote control when worn buttons, signal failure, or compatibility issues prevent normal operation. When your remote no longer responds as it should, contact us or give us a call for prompt professional service.